

")
")


")


It’s dangerous to rappel upside down! Here’s how to do it right.
Even though I’m going to include this piece in the blog’s Rookie Guide, I really wouldn’t advise you to rappel upside down unless you have some serious experience as a rappeller, and you’re particularly fond of thrills.
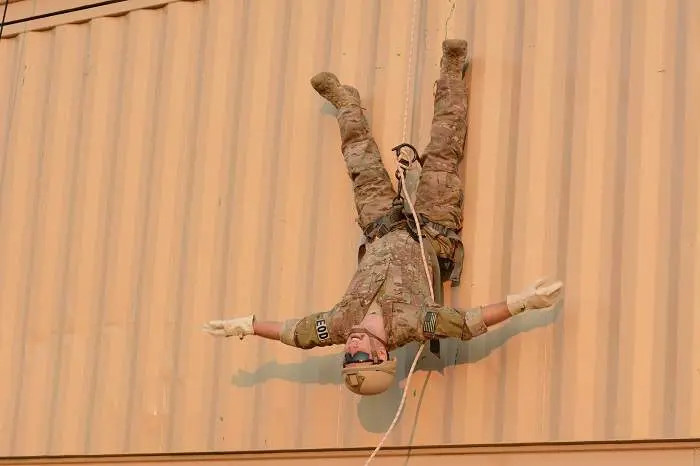
Inverted rappelling is an advanced rappelling technique, best suited for those looking for a bit of an adrenaline rush. It’s also practiced by soldiers as part of military operations or rescue efforts.
Generally, I’d say that conventional rappelling is exciting enough, but some people practice inverted rappelling nonetheless, so I decided to create this quick guide teaching you how to do it properly.
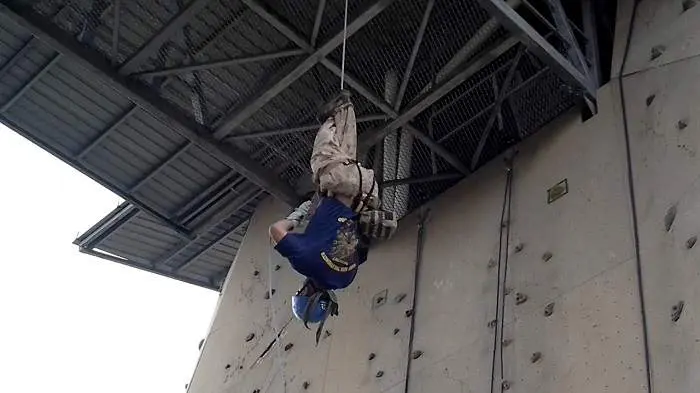
Inverted rappelling can generally be practiced on overhanging faces. It’s not that it’s particularly difficult to do, but the challenge comes from seeing everything from a different perspective, which means that you might have trouble identifying potential hazards. If you practice it long enough, though, you’ll get used to the new perspective and you’ll feel much more at ease with yourself.
Do I need any special gear for rappelling upside down?
I’d say you can use your conventional gear to rappel upside down, but one thing to keep an eye out for is how you prepare your harness. Because you’re going to be shifting your weight around, your harness should be fitted tightly and as close to your center of weight as possible.
Other than that, a very sturdy and well-fitted helmet is a must, as well as a trusty belayer, just in case something goes wrong. I’ve written an article on how belaying devices are made and why they’re so important for rappelling, just in case you need some extra insight.
The main risks associated with rappelling upside down is that the sudden rush of blood to the head might cause you to lose consciousness for a bit. The next thing that could go wrong is that you might fall out of your harness, which is why I’m telling you again to strap it on tight!
Obviously, you’ll need a high-quality pair of rappelling gloves that offer a great mix of comfort and grip. For this particular technique, I’d advise you to go with a synthetic pair, not just because of the added breathability and lightness, but also because you’ll actually be able to feel the rope in your hand. Thick leather gloves, while offering improved protection, usually sacrifice rope feel.
How to rappel upside down properly.
Now that you know a little bit about the risks involved, it’s time to learn exactly how to rappel upside down while minimizing danger. This rappelling technique is rarely employed by conventional climbers, but it is used often by military personnel.
Soldiers are trained to do it properly and practice it often, as it allows them to rappel while facing the enemy and pointing a gun at them. Inverted rappelling is also quite useful in urban scenarios such as rappelling down a building and catching a peek through a window, thus taking the enemy by surprise. Even though I only practiced it briefly, and mostly in controlled scenarios, I could definitely see the tactical benefits of this challenging technique. As a “regular” rappelling enthusiast, however, I wouldn’t go out of my way to do it just for kicks.
Here’s a step-by-step guide on rappelling upside down safely.
- Start your rappel as you normally would, calmly and slowly. Wait until you’re off the cliff and hanging freely before you change your position.
- Once you are free-hanging, swing your legs up and angle your head down. In order to make this easier, you should place your belay point a bit higher on your body, similar to what you would do while wearing a caving harness.
- Cross your legs on the rope and start rappelling down slowly, controlling your descent carefully as you go. You are now rappelling upside down!
- Some people choose to do it with their backs facing the wall, while others rappel with their chest facing the wall. Each has its own advantages and disadvantages. I will say this, though: if you rappel upside down off the face of a building, doing it with your chest facing the wall allows you to use one hand to balance yourself and keep a safe distance from any windows or ledges. This is rappelling technique also feels more natural.
- Always be mindful of how fast you descend, and try to keep your head facing downwards.
- For the last part of the rappel, you should be prepared to pop back up into a normal rappelling position.
The final thing I would recommend is to take baby steps. You might see others doing it, and it might not seem like much, but the sensation of suddenly being upside down is sometimes unpleasant enough to trigger some serious physical discomfort. Try it for a little while, see how it goes, and if you feel like you’re getting dizzy or you’re losing control, just switch back up to a normal position.
Let’s observe someone rappelling head down and analyze the technique carefully.
For added insight, I’ve added a short video demonstrating a head down inverted rappel from a window ledge and off the face of an old building. The video is several years old, mind you, but I think it’s still relevant to what we talked about today.
As you can see, the rappeler has both ropes cast down and prepares to rappel using the ledge of the window as a starting ground. When rappelling from windows or from the top of buildings, you have the advantage of a firm starting point. When rappelling off the face of a cliff, things can be a little trickier.
He appears to be starting off on his back, but he quickly turns around and faces the wall with his chest. This allows him to use his left hand for guidance, while he holds the rope firmly with his right hand.
His legs are crossed around the rope, which improves his balance, as well as his aerodynamics. The back is straight and he faces the ground directly, not looking at his hands but at what’s in front of him as he goes down.
The rappelling process itself is rather quick, but less experienced rappelers can and should take their time going down. The old building used in this video probably had around six or seven stories. The overall height from the starting point is 35 meters or 114 feet, which is a respectable height for any rappeler.
As he approaches the bottom of the building and the end of the rappel, the man uses his guiding hand to create some momentum, turns around in the blink of an eye and is suddenly in a classic rappelling position, ready to touch the ground with his feet. This final stretch also involved an entire building story, so keep that in mind for reference as you finish up your own descent.
Conclusion.
Rappelling upside down is not for the faint of heart, and should generally be attempted under the careful supervision of a professional, especially if you’re a rookie.
I hope that this small guide has given you some insight into what it means to rappel upside down. We covered the challenges involved, the potential dangers, and the steps that you need to take to ensure that you’ll be safe while you practice it on your own. If you have any further questions or would like to provide some more insight on the matter, don’t hesitate to speak your mind!
Until then, as always, stay safe and enjoy the view, albeit from a unique perspective this time around.


